Wednesday, May 28, 2008

Finding rows associated with a maximum value in MySQL

This example shows how to display the rows associated with a maximum value (or minimum) of a column. To illustrate this we'll look at the following scenario:

We have a MySQL table called "employees" and we want to display the employees whose salaries (kept in the "salary" column) are equal to the maximum salary in the table. To do this, we must first find the maximum value:

SELECT (@x:=MAX(salary)) FROM employees;

Next, we'll want to display all the information available on people who have that salary. Again, we do this using another SELECT instruction:

SELECT * FROM employees WHERE salary=@x;

This is a simple example however a tough one to find on the Internet. Many thanks to Radu for helping me on this.


Sunday, May 18, 2008

Auto Web Page Browser

This application will cycle through a list of URLs you give it with a random delay in between each visit.

Features:
- cycle through a list of up to ten URLs
- configure the delay between each visit to suit your own needs
- easy to use

How it works

Written in AutoIt v3, Auto Web Page Browser is designed to read the specified URLs from a file and then visit each of them using Internet Explorer. Once an empty row or the end of the file is reached the program will automatically return to the top of the list.

Installing and using Auto Web Page Browser

Download the program archive here (hosted at Media Fire), extract it somewhere on your hard-drive (for example "C:\AWPB\") and edit urls.txt with the list of URLs you want to visit. Save your changes and then run awpb.exe. The program will now begin to visit each of the URLs you gave it.

To close Auto Web Page Browser right click its icon in the tray (the bottom right area of the screen) and click Exit.

To configure the delay between each visit, close Auto Web Page Browser, open awpb.ini and change the delay key (by default it is set to 1,000 miliseconds). The minimum delay between visits is 3-6 seconds (with a delay key of 0 miliseconds). For example, by setting the delay to 20,000, the program will wait from 23 to 26 seconds between each visit.

Disclaimer: I did my best to ensure this program is bug free and safe to use, however I'm not responsible for any damage it may cause. Use it at your own risk.

Feedback on this program is greatly appreciated. Whether or not this program will be upgraded in the future is entirely based on the amount of feedback I receive from its users.

Friday, May 16, 2008

How to display HTML, PHP and JavaScript code on your blog

While writing some PHP and JavaScript code in another post here on sparktask I encountered the following problem: my code would be interpreted by the server and not displayed properly (if it all). After surfing the web for a solution I stumbled upon this website:

http://www.addressmunger.com/display_code/

The principle behind this solution is converting some or all the letters of your code to their ASCII counterparts. Although simple it works brilliantly. The downside of this solution is that if you try to later edit your post, all of the ASCII code will be reconverted to normal letters. The best way to avoid this disadvantage is to make sure you won't need to edit your posts.

Auto-sum a dynamic form

Most examples on the Internet regarding automatically adding together the values of a form and then displaying the result usually involve forms that are made up of two, three input boxes. So, what if you’re looking to do this on a dynamically generated form, perhaps generated with information extracted from a database, and you don’t know from the beginning how many input boxes you have?

My solution was to dynamically generate both the HTML form and the JavaScript code, both using PHP. To illustrate this I'll use a simple financial calculator example. Note that I'll only present the actual code that does all the adding and code-generating, without any attempts to verify the user's input (for example if he enters letters instead of numbers) as this would be beyond the purpose of this post.

Let’s assume we have a database of fund names in which the user has invested some money. We want to create a form that allows the user to specify how much money is currently invested into each fund, while also displaying the total amount of money invested.

For simplicity we’ll consider that the fund names ($N of them) have already been extracted from the database and are stored in an array called $funds. In our example I'll simply declare these at the start:

<?php
$N=5;
$funds[1]="RoOilingInc";
$funds[2]="BakingRUs";
$funds[3]="ManchesterUnited";
$funds[4]="Microsoft";
$funds[5]="Apple";


Moving on, it's time to create the JavaScript code that will sum up the form.

echo "<script type='text/javascript' language='JavaScript'>

function usum() {

var a = 0;
var b = 0;
var c = 0;
";

For ($i=1;$i<=$N;$i++)
{
echo " c = document.myform.".$funds[$i].".value;
c += '';
b = (a * 1) + (c * 1);
a = b*1; ";

}
echo "document.myform.sum.value = parseInt(a); }
</script>";

What this code does is generate a JavaScript function each time the page is accessed, using the $funds array. The first line of code tells the browser we're going to write some JavaScript code. Afterwards, using PHP, we declare the function name and initialize three local variables: a, b and c. Now with a For loop (with a number of $N steps) we write 4 lines of JS code for each element in the $funds array. When executed, these instructions simply add to the local variable a the contents of a certain input box. Once the For loop is exited, we instruct JavaScript to set the value of the sum input box to the value of a.

Now, for the final section of code, the generation of the HTML form. First we need to declare the form and create the input boxes:

echo "<FORM NAME='myform'>";

for ($i=1;$i<=$N;$i++)
{
echo $funds[$i]."$<INPUT TYPE='text' NAME='".$funds[$i]."' ID='".$funds[$i]."' onChange='usum();'>
";

}

Lastly, we need to create a disabled input box where we can display the result:

echo "TOTAL VALUE$ <INPUT TYPE='text' STYLE='color: #00cc00; background: #ffffff; border: solid 0px #000000;' NAME='sum' DISABLED VALUE='0' ID='sum'></FORM>";

?>

Alright, we're finished. Run the .php file (don't forget to upload it to a website or use an Apache server) and you should see the 5 input boxes. Once you write a number in one of them it should be added to the Total Value display.

Hope this helps.

Saturday, May 10, 2008

Macromedia Flash - Roll Out Menu Tutorial

In this tutorial we'll look at creating a roll-out menu in Macromedia Flash 8 and MX. A roll-out menu is usually made up of a button of some sorts that, when you click on or hover your mouse above it, makes a menu expand out of it. When this menu expands underneath the button it is called a dropdown menu. In this particular example we’ll be creating a menu that expands to the right of the button when the user hovers his mouse over it, although the process is quite similar for all types of menus.

Since this is only an example, we won’t have any complex design for the button, background or menu. The aim of this tutorial is explaining the basic workings of the menu and obtaining a smooth movement, not coloring it nicely.

Note that all of the shortcuts that I use are for Macromedia Flash 8, however they should apply to MX as well.

1. First up, create a new Flash document by going to File (Alt+F) and New. If prompted for a file type choose Flash Document and press OK.

2. With the Rectangle tool (shortcut R) create a square or some other shape.

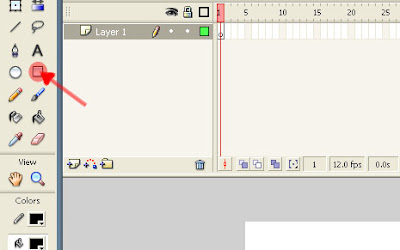
This square will be our button that, when clicked or hovered, will expand the rest of the menu. As I said, the colors of the button aren’t really important in this tutorial. Personally, I chose a red filling with a black outline.

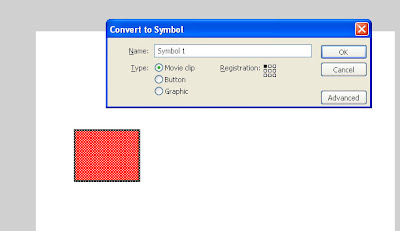
3. Select this square with a double click, right click it and press Convert to Symbol… (or, once you’ve selected it, press F8). Make sure that Movie clip is selected, give it a name (or leave it Symbol 1) and press OK.

This Movie clip will hold all of our animations and objects for this drop-down menu.

4. Next up we need to give this movie clip an Instance name.

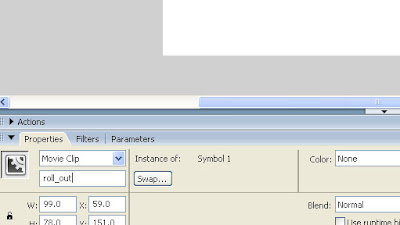
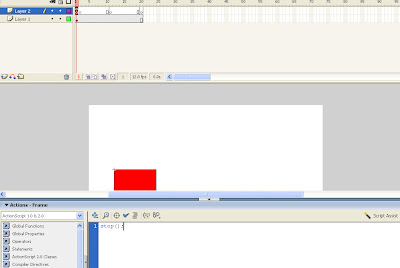
Find the Properties section. Underneath the menu that says Movie Clip (like in the image above) you should see an input box that says Instance name. Click on it and type one (I typed roll_out).

So, what exactly is an Instance name? Well, you can have multiple copies of a symbol (whether it is a movie clip, button, whatever) in a single Flash document. However how can you make Flash tell one symbol apart from the others? All you need to do is assign a different Instance name to each of the copies (instances).

Note that while you can have multiple copies of the same symbol in your project, you can’t assign the same instance name to more than one symbol.

5. Double click Symbol 1 to edit its contents.

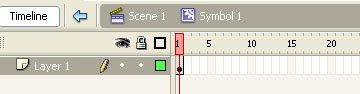
You can tell that you’re in Symbol 1 by looking near the top of the screen. Scene 1 is the main work area, also called the root. Once you are done working in Symbol 1 you can go back to the root by pressing Scene 1.

6. Expand the duration of Layer 1 to 20 frames. You can do this by right clicking the box under 20 (as in the image above) and then choosing Insert frame.

Another way to do this is by left clicking on frame 20 and then pressing F5.

7. Insert a new layer (make sure that you’re still in Symbol 1 and not the root) by going to Insert (Alt+I), Timeline, Layer. A new layer should appear right above Layer 1, named Layer 2. This is where we will hold the actual animations.

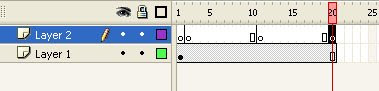
8. Insert keyframes at frames 2, 11 and 20 by right clicking the boxes and choosing Insert Keyframe.

By the end of this step this is what your timeline should look like.

Let me explain why we just did this. The animation will consist of 3 parts:

- a neutral state (when the menu is hidden and nothing is happening) that will be kept in frame 1

- a roll-out state (when the user moves his mouse over the button) that will be kept in frames 2-11

- a roll-in state (when the user moves his mouse off the menu and/or button) in which the menu is hidden once again (frames 12-20)

9. First thing first, let’s set up the neutral state. While our animation is here we don’t want it moving. The movie clip will only leave frame 1 when we tell it to (which we will do later on).

To do this, select frame 1 of Layer 2 and go to Actions (if you can’t find this section try pressing F9). Once here, type this code:

stop();

If you’ve done this correctly you should see a α symbol on frame 1 of Layer 2 in the timeline. This tells you that that particular frame has some ActionScript (the programming language of Flash) applied to it.

Whenever your animation reaches this frame it will, as you might have guessed, stop (sort of like hitting the Pause button on a movie).

10. Now we’ll focus on creating the roll-out and roll-in animations. First, go to frame 2 of Layer 2 and create a small rectangle next to the red one. Turn it into a Movie clip. Now copy this new movie clip into frames 11 and 20 in the exact same spot. Go to Edit, Copy (or hit Ctrl+C) to copy the movie clip and then Edit, Paste in place (or hit Ctrl+Shift+V) to paste the movie clip in the exact same spot.

Now, select frame 11 and, using the transform tool (hotkey Q), make the rectangle bigger and move it to the right of the box, as in the image below:

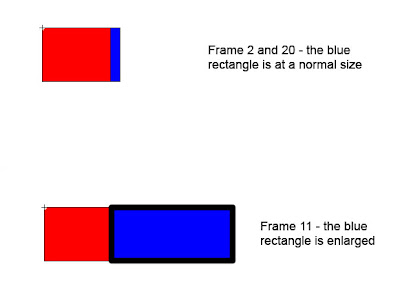
Finally, right click one of the frames between 2 and 11 and choose Create Motion Tween. Now do the same with a frame between 11 and 20. If you have a look at each frame from 2 to 20 you should first see the new movie clip get larger and then smaller. This will be our menu.

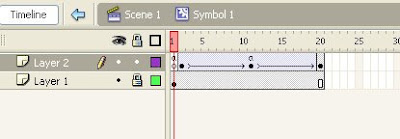
Lastly, we will need to set up some more ActionScript. Place another stop(); action on frame 11, just like you did on frame 1. Make sure that you don’t have any objects in the frame selected, otherwise the code will be applied to those objects and not the frame itself. If this happens you won’t see the α symbol on top of that frame.

Here’s what your timeline should look like:

11. Now that we’re finished with setting up the movie clip, navigate back to Scene 1.

12. Select the movie clip and write the following code for it (you can check if you did this correctly by looking at the name of the Actions section. If it says Actions – Movie Clip you’re doing fine):

on (rollOver)

{

_root.roll_out.play();

}

When the mouse is placed on the movie clip (on (rollOver)) the program will execute a set of instructions held between the curly brackets. In this case the only instruction is to find a movie clip in the root named roll_out and tell it to play (sort of like hitting the Play button on a stereo). To make the menu roll out when the button is clicked instead of just hovered by the mouse, replace rollover with release.

To understand the _root.roll_out part, let’s see the following example:

- we have a movie clip in root with the instance name A

- inside A we have another movie clip with the instance name B

- to make B do something (for example play) we would use this code:

_root.A.B.play();

_root.A.B is the path to the movie clip we want to affect. In our tutorial this is simply _root.roll_out.

If you press Ctrl+Enter or go to the Control menu and hit Test Movie you should see our first red box. Move your mouse over it and the blue box should expand out of the first one. That’s ok, but if you move your mouse button off of it, it won’t change.

13. To fix this, close the test window and create a new layer (here in root). Move this new layer (probably named Layer 2) under the first layer (Layer 1) by holding the left mouse button clicked on its name and dragging under Layer 1.

14. In this new Layer 2 create a rectangle that covers the whole window area. Convert this to a movie clip and apply the following code to it:

on (rollOver)

{

if (_root.roll_out._currentframe > 1 && _root.roll_out._currentframe < 12)

{

_root.roll_out.gotoAndPlay(22 - _root.roll_out._currentframe);

}

}

This looks a bit more complicated but let me explain. When our new movie clip is hovered this means that the mouse is not currently hovering the menu. This in turn means that, if the menu is currently expanded, we need to tell it to close.

First we check if our menu isn’t already closed (by _root.roll_out._currentframe > 1). If this returns ok then we check if our current frame is somewhere in the roll-out animation (frames 2-9) or in the actual roll-out state (frame 11). If both conditions are OK, then we can proceed and make it close.

Let’s assume our movie clip is at frame 11 (fully rolled-out). We would need to tell it to go to frame 12 and play, thus completing the animation. But what if the menu never managed to completely roll out? What if we’re trying to close it before it reached frame 11? If we would simply write gotoAndPlay (12) and the animation only reached frame 3, the blue box would quickly jump to an enlarged state and then start shrinking, which looks very bad. If you want to, try replacing (22 - _root.roll_out._currentframe) with (12) and move your mouse off the menu and button before it finishes rolling out.

We can fix this by simply skipping the part where the menu would roll in starting from its maximum position. Have a look at roll_out. If for example we’re at frame 5, to roll it back it we would need to start at frame 17. Frame 6 means frame 16 and so on.

If you have a look at these numbers you’ll see that the frame we need to go to is (22 – our frame number).

15. You’re done. Save the file, hit Ctrl+Enter and try it out.

Final words

The end result of this tutorial isn’t very spectacular, I know. However, once you’re understood exactly how this menu works, you can move on to creating better and more powerful menus.

In the source file archive (which I’ve included here) you can also find an example of this method at work in a small, slightly more practical version.

Friday, May 9, 2008

AutoItv3 versus AutoHotKey

When trying to enter the wonderful (and with a slightly bad reputation) world of Windows scripting and macro-building, one is bound to come across two programming languages in particular: AutoIt v3 and AutoHotKey. At first glance they seem quite similar and this is only natural: AutoHotKey is built on a version of AutoIt v2, they both try to stand out with their capability of simulating key strokes and mouse clicks, ability to automate certain tasks and GUI capabilities. Once however one starts to delve deeper into the inner workings of these programming languages certain differences become apparent.

The first difference you should notice is the program syntax. While AutoIt is quite similar to C-like languages in format (such as C++ and PHP), AutoHotKey is quite unique, unfortunately in a negative way.

A good example on this is calling functions inside the program. While in C++, PHP and AutoItv3 the parameters of the function would be contained between two parentheses, separated by commas (such as function_name ( parameter1, parameter2... ); ), in AutoHotKey the parameters are only separated by commas (function_name, parameter1, parameter2....). Although not a huge disadvantage, this does not only make switching to and from AutoHotKey and other languages more difficult but it also discourages new users.

Another advantage AutoItv3 currently has over AutoHotKey is its larger fan-base, which translates into more user-made function libraries that greatly increase the ease of building an AutoIt program. These libraries range from better GUI control to file management and even functions to manipulate Internet Explorer.

One of the things that impressed me most about AutoHotKey is its HotString feature. To illustrate this we'll use the following example: you're chatting online and for some reason want to avoid using certain acronyms (such as "lol", "brb" etc). This is easily done using the HotString feature of AutoHotKey:

::brb::be right back

The code above will create a new HotString (sort of like a HotKey) that, when activated, will replace "brb" with "be right back". Back to our online conversation, let's say that by mistake you type "brb" and hit "Enter". No problem, the program will have already converted "brb" to "be right back". This HotString feature can have a wide variety of uses, as illustrated on the AutoHotKey website. Also, while most actions are of about the same difficulty in implementing into AutoIt and AutoHotKey, the HotString feature would prove very problematic and time consuming to implement into AutoIt.

Overall i believe that, faced with the choice of learning either AutoIt and AutoHotKey, you would probably be better off with going with AutoIt. The user-made libraries really help at times when designing your own solutions would take a lot of time and patience. Personally I've been using AutoIt for about one year and a half, maybe two. Since first discovering it back in 2006 I've always used it, along with PHP, as the main programming language in which i work because of its rich libraries of functions and similarity to other programming languages i used in the past.

Later edit: After working with AutoHotKey further I have to say that, although I still find the syntax annoying and the incorporated libraries of functions aren't as evolved as those of AutoIt, when it comes to handling hot-keys and similar types of input (such as the HotString feature), AutoHotKey shines.

While I still think that, overall, AutoIt v3 is superior, having a look over what AutoHotKey has to offer is well worth the time and could be a life-saver in the future.

Tuesday, May 6, 2008

Why does this page exist?

To tell you the truth, I'm not that sure either. I'm also not sure why I'm writing this particular post, seeing as I was planning not to create the usual "why i have a blog" speech that is usually one of the first posts on blogs, big or small. Strangely, here we are.

Still, i will try to keep it short and simple (as the K.I.S.S. rule dictates): this blog is home to different ideas i might have or projects i might be working on or just starting off, usually in, but not limited to, the field of computer science. As time goes on however, depending on how (and if) this blog will evolve, the purpose of it may change as well.

What this blog won't (hopefully) be is another record of personal opinions on matters of philosophy, what my vision is on inter-human relations or anything similar. There are already plenty of places you can have a look over if that's what you're looking for.

I hope you enjoy your stay and find the contents of this blog useful and/or entertaining.